
How to start blogging and earning money out of it.

The benefits of blogging … making money as you go.
I can think of several reasons why blogging is good for you. I don’t want to compare it to a diary. It kind of makes me feel introvert-ish, which I believe I am not and wouldn’t like to be. There is a difference in that you ‘publish’ your thoughts and the whole world can read it. That is the beauty of blogging. It is all the more better if you write your thoughts and keep it original. I find millions of guys are on the net but very few are original. The idea is to be original. Facebook more than any other social media platforms are littered with very little original stuff. People are just circulating stuff that are not their own. I guess you do need a majority of people who are not original but circulate stuff that they want to ‘share’ or ‘like’. It gives the person a sense of elation, attention and sometimes appreciation especially if what is original. A blog is different … you own it and not facebook or other platforms.
Step by step way to making your own blog.
Here I am going to show you some steps to create a blog. I must admit some of the stuff is not original as I am a consumer of technology and not a creator or developer. I have gleaned the part below from the net … which will be useful to follow. I must acknowledge other internet marketers for writing these steps.
Step 1
Essentials: To set up a self-hosted WordPress blog, you will need:
o A domain name. Choose a domain name carefully, it could be the beginning of a brand … your brand. There are advantages and disadvantages of using your own name. Just think what searchers are more likely to search. Your name or something they want? It depends on what are your goals.
o A credit card. You will be required to pay for hosting. Keep the last 4 digits in your memory as it is often asked to identify yourself when you chat for support. The other identification is the last 4 characters of your password.
o Specific time set aside for this it could take you at least 20 minutes.
It’s easier if you haven’t already registered your domain. It’s also cheaper. I will show you how to get one for free, using the service I recommend in Step #2.
However, if you have already registered your domain, no sweat. You will simply need to add an additional step. I will explain the process at the end of this post.
Step 2
Create a hosting account. This is where your blog will ‘reside’. This is a server which is basically a remote computer which has a very large capacity. It is in the cloud (i.e., a remote computer). Here you will rent space to install the WordPress software and manage your blog. This may sound daunting, just hang on … it really is quite easy.
Why BlueHost …
Now which hosting service to use a there are zillions of them. My own experience and research points to BlueHost, which I highly recommend. Here are some reasons which I have gleaned from the net and have experienced:
o Reason #1: Support. BlueHost has great 24–7 support via phone, e-mail, or chat. I have personally used it a few times and found the support staff to be courteous, professional, and helpful.
o Reason #2: Reliability. BlueHost is super reliable. It boasts an uptime average of 99.9%. That’s about as good as it gets. This means that the system is continuously working.
o Reason #3: Ease of Use. BlueHost is super easy-to-use (as you can witness in the above video). In fact, shockingly so. They have worked hard to make it simple for non-geeks.
o Reason #4: WordPress. Interestingly, WordPress itself only officially recommends three hosting services. BlueHost is number one. It hosts over 850,000 WordPress blogs. I went to them because of this.
o Reason #5: No Limits. BlueHost offers unlimited disk space, unlimited bandwidth, unlimited domains (i.e., you can host multiple blogs or sites on one account), and unlimited e-mail accounts.
o Reason #6: Affordability. BlueHost is inexpensive—about $4.95 to $6.95 a month, depending on which plan you select. The longer you are willing to commit, the cheaper it is.
o Reason #7: Values. In its Terms of Service (see Section 10.03, BlueHost prohibits pornography, nudity, and other adult content. It strictly enforces this standard and deletes sites that violate it. Personally, I don’t want my blog sitting on the same server as some pornographer. If you feel the same way, you may be surprised to know that almost all of the most popular hosting services allow pornography on their servers.
Note: I am a BlueHost affiliate, which means the company pays me a commission every time someone signs up via one of my links. But this did not influence my recommendation, because all hosting services have similar programs. I recommend BlueHost because I honestly believe they offer the best hosting available.
BlueHost specializes in shared servers and it is the right choice for 95% of bloggers.
By the way, BlueHost offers a thirty-day, money-back guarantee, which is written into their Terms of Service. I have personally tested this and got my money back within a few hours. So there’s really no risk on your part.
Okay, so if you are still with me, go to the BlueHost home page. Click on the Sign Up Today. Or
CLICK HERE TO SIGNUP FOR BLUEHOST.COM
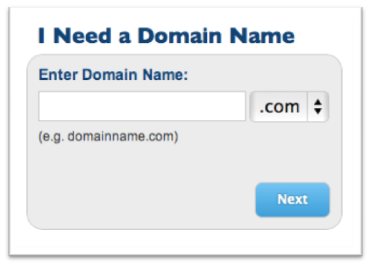
Now you need to decide whether you need a domain name or you already have a domain name. I’m going to assume that you haven’t previously registered a domain, using some other domain registration service (e.g., GoDaddy.com). If you have, I will explain what to do at the end of this post.
Now enter your domain name in the left-most box, choose the appropriate extension (com, net, biz, whatever) and click on the Next button.
Fill in your account information and then scroll down to select your package. As you can see, the prices range from $4.95 to $6.95 per month. It all depends on the length of your commitment.
Keep in mind, you will be required to pay the annual rate in advance. That’s how BlueHost is able to offer these super low prices. Here’s the math:
o 12 months at $5.95 per month is $71.40 per year and $71.40 upfront.
o 24 months at $4.95 per month is $59.40 per year and $118.80 upfront.
o 36 months at $3.95 per month is $47.4 per year and $142.20 upfront.
I would not sign up for any of the other services listed on this screen, but that’s up to you.
Now enter your billing information. Confirm that you have read and agree with BlueHost’sTerms of Service, and then click on the Next button. The system will now verify your credit card information.
BlueHost will next ask you to “Select the Upgrades that Best Suit Your Needs.” I would skip all of these. Click the Complete button at the bottom of the page.
Now you need to choose a password for your account. Click on the Create your password link:
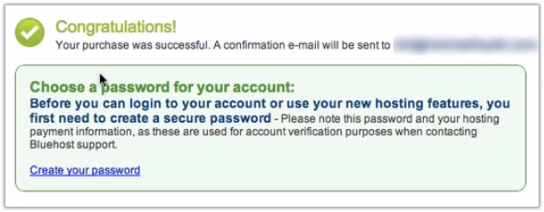
Use the Password Generator option to create a strong, difficult-to-hack password. Copy this to the clipboard by pressing Command-C if you are on a Mac or Control-C if you are on a PC. Now click the Paste button to paste the password into the appropriate fields. The click the Create button. This creates your new BlueHost account.
Then you will be asked to login to your domain. Use the password you just selected. Since you previously copied it to the clipboard, you can paste it with Command-V on the Mac or Control-V on the PC. Now click on Login.
You may have to click through another upgrade offer. Feel free to decline by kicking on the “No thanks” link and proceed to the next screen.
Now you should be at the cPanel (short for ”Control Panel”). Dismiss the “Need Help Getting Started?” dialing box.
Step 3
Install WordPress. Don’t be intimidated by this step—it’s amazingly simple. The process used to be complicated, and you had to be a semi-geek to pull it off. But BlueHost now makes it super-simple. Trust me, anyone can do this.
Scroll down the page to ”Site Builders.” Click on the WordPress logo (or the link next to it) and wait for the new page to load. You should now be looking at a page full of ”scripts.” Again, don’t get overwhelmed. Simply click on the ”WordPress” logo under “Blogs.”
This will take you to a new page. Click on the Install button. This will take you to the WordPress installation screen. It contains four steps:
o Step 1: Installation Preferences. By default, BlueHost will select the most current, stable version. That’s what you want, so leave it as is. In the field where it says, “Where would you like WordPress installed?” just leave it blank. This is really for people who already have a website and are installing WordPress on top of it.
o Step 2: Advanced Options. Give your site a new name. Then click on the link for more options. Give yourself a username and password. (Also, copy the password to the clipboard.) I would make it something other than “Admin.” Make sure you have selected “Automatically create a new database.”
o Step 3: Select Plugins and Themes. I would uncheck all of these. You can reselect them later if you need to.
o Step 4: Read the Legal Information. Check the box that says you have read the terms and conditions of BlueHost’s licensing agreement.
Now click on the Complete button. You might get an error message here that warns you the directory exists and you are about to overwrite the files in it. Don’t be alarmed. This is for those people who are installing WordPress on a site that is already live.
You can simply click the checkbox acknowledging that the directory exists and acknowledging that you understand this action will overwrite whatever files might be there. You might also have to deselect the Plugins and Themes again. Again click, the Completebutton.
BlueHost will tell you it is installing WordPress. (You should see a progress meter.) When it is done, you will get a screen with your Blog URL, Login URL, username, and password. BlueHost will also e-mail this information to you, but I like to have a backup. I would write it down or take a screenshot. Also, copy the password to the clipboard.
You’re making great progress! Now things will speed up considerably.
Step 4
Load your new blog. Simply click on the blog URL address. Your new blog should load in a new browser tab.
As you can see, there’s nothing very fancy here. WordPress uses a very generic theme by default. But that’s the beauty of WordPress. There are thousands of themes available. I will recommend a few in a minute.
Step 5
Log into WordPress. While you’re still on your blog’s home page, scroll down to the Login link in the lower right-hand side of the sidebar. Click on the link.
You should now be looking at your WordPress login page.
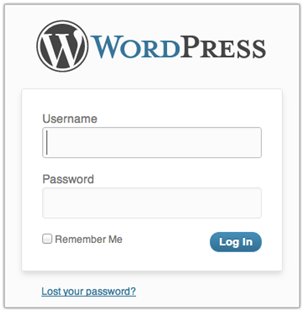
Now enter your username and password. (Remember, you wrote these down in Step 3.) You will soon see a welcome screen. For now, click Dismiss.
You are now looking at the WordPress “Dashboard.” Sometimes, bloggers refer to this as the WordPress back-end. The front-end is what your readers see—your normal blog site. The back-end is what you see—how you control what appears on the front-end.
Step 6
Write your first post. Click on the Posts | Add New option in the left-hand side menu. You should now see the New Post screen.
Enter the title of your post, perhaps something like, “Welcome to My Blog.” (I know, clever, right?)
Now write your first post in the field directly below the title. Perhaps you could explain why you are starting your blog, the topics you plan to write about, and how often you intend to post.
Now click the Publish button. This literally publishes your post for the world to see. You can click on the Preview Changes button to see it.
Congratulations! You have just published your first post on your very own self-hosted WordPress blog.
Step 7
Bookmark your blog. You’ll want to come back to your blog on a regular basis, so it’s a good idea to bookmark the two main pages: the front-end and the WordPress back-end.
In case, you have already closed the page to the back-end, you can re-open it by going to: http://[the name of your blog]/wp-admin.
If you have followed my instructions, you now have your very own self-hosted WordPress blog. Pretty exciting, huh?
Installing themes and knowledge base
The next step is to install a theme. There are literally thousands of free ones available. However, I recommend a premium theme (i.e., one you pay for) because you will usually get a better design and more features. Some of my favorites include:
• WooThemes.com
• ElegantThemes.com
• StudioPress.com
• DIYThemes.com
• Theme Forest
Also, Bluehost offers several how-to videos. They include everything from “How to Transfer a Domain,” “How to Setup Your E-mail Accounts,” to “How to Create an FTP Account.”
Note: If you need to move an existing blog from WordPress.com to your new self-hosted WordPress blog, I recommend you read this article: “How to Properly Move Your Blog from WordPress.com to WordPress.org.” Just google it.
If you want to learn more about WordPress, I recommend WP101.com. This is a tutorial site with hundreds of videos on every aspect of WordPress.
If you know someone else who could benefit from this information, please pass along the link to this post. If you would like to embed the screencast in your own blog, please feel free to do so.
If you have already registered else where
Optional: What if you have already registered your domain name on another service? No big deal. The first thing you will need to do is to point your domain name to the BlueHost servers. This will vary depending on where you registered it. BlueHost describes the process here.
For example, at GoDaddy, where I have some domains registered, you log in, then go to Domains | Domain Management screen:
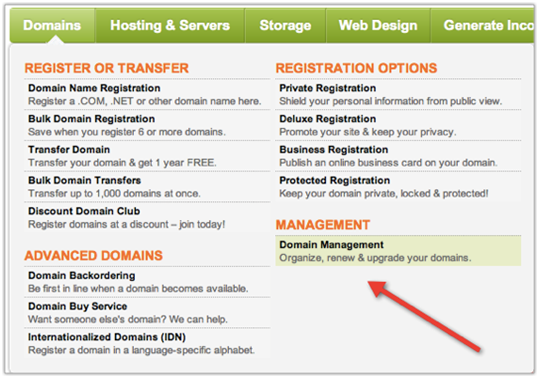
Now click on the domain name you want to point to BlueHost. You should now be looking at the “Domain Details” page. Scroll down to the bottom, left-hand side of the page. You should see a section called “Nameservers”:
Click on Set Nameservers. A new screen should pop-up.
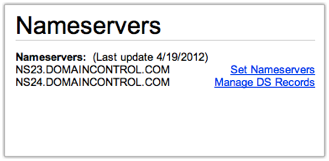
• Enter ns1.bluehost.com in the field for Nameserver 1.
• Enter ns2.bluehost.com in the field for Nameserver 2.
Click OK. That’s it. Now log out. It typically takes 24–48 hours for these changes to take effect. You might get lucky, and it will start working in an hour or two.
Please note: BlueHost or your Registrar (the company from whom you bought your domain) may change their procedures from time to time. If you have any problems, please check with them. I do not provide technical support for this process.
Once you have done this, you can begin the process of setting up your WordPress blog. In Step #2, after you click Sign Up Now, you will need to enter your domain name in the right-most box that says, “I Have a Domain Name.”
Now click the next button. Everything else should be the same. If you get stuck, you may need to wait for the change in your Nameservers to take effect before proceeding. Be patient.
YOU HAVE SUCCESSFULLY CREATED YOUR OWN BLOG!